Filtering (masking out) colors can be a very useful tool when one wishes to visually
separate the image from a set of colors for statistical analysis or better visualization
of specific color range.
As filtering is an integrated feature of the app, activating a filter goes hand with hand
with other features like Overlay view and grid / pixel value mapping. Note that when a ROI
is active, the filter is automatically applied only on its area.
You can enter a filter via a dedicated dialog or via the command line (refer to the
Command Line interface).
Though the dialog itself fully layouts the format, we’ll re walk it here for extra
clarifications.
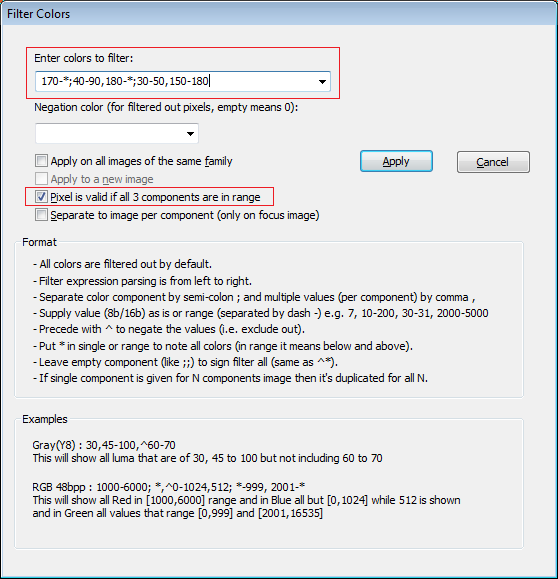
You supply a filter while the values in the “Enter colors to filter:” edit box are used
as a positive filtering (filter-in) i.e. colors entered will be seen while all others are
masked out by default so if you just enter nothing (blank sheet), all colors will be
invisible.
The “Negation color” edit box is used for visualization purpose so one can give a solid
color(s) to all masked out (or filtered out) pixels so they can be easily distinguished.
Obviously, it’s up to the user to select the proper negation color (0 is the default).
Good example is YCbCr (or YUV) that uses a shifted chrominance values so 0 for CbCr is
actually 128 hence a good negation vlaue might be: 0;128;128.
The usage format is quite forward so here it is:
- All colors are filtered out by default.
- Filter expression parsing is from left to right.
- Separate color component by semi-colon(;) and multiple values (per component) by comma(,).
- Supply value (8b/16b) as is or a range (separated by dash -) e.g. 7, 10-200, 30-31, 2000-5000. Note that we don’t support 32b filters as we do care a bit for performance 🙂
- Precede with ^ to negate the values (i.e. exclude out) e.g. 0-100,^99 will filter only pixels ranged [0,100] excluding 99.
- Put * in single or range to note all colors (in range it means below and above).
- Leave empty component (like ;;) to sign mask-out all (same as ^*).
- If single component is given for 3 components image then it’s duplicated for all 3.
Common examples:
Gray(Y8) : 30,45-100,^60-70
This will show all luma values that are of 30, [45,100] but not including [60,70]
RGB 48bpp : 1000-6000; *,^0-1024,512; *-999, 2001-*
This will show all Red in [1000,6000] range and in Blue all but [0,1024] while 512 is shown
and in Green all values that range [0,999] and [2001,16535]
Dialog extended control (via check box items):
- Apply on all images of the same family
Relevant when working in comparison mode. You can choose to apply the filter on all
images that share the left-most (no. 1 in the group, or FI) core properties (image
base type and no. of components). - Apply to a new image
Sometimes it’s useful to apply the filter and then compare it or simply refrain from
touching the current image state. This will simply create a new image (assuming there’s
a free HK) and will apply the filter on it. - Pixel is valid if all 3 components are in range
For 3 components (channels) images, it’s sometimes essential to filter the pixels as
a group and not per channel. The best way to understand this semantic is via an
example: Suppose you have a RGBx8 image and you write a filter of this sort
[100-128,200-*,*-80] (and negation color is 0) then w/o checking this option, a pixel
like <60, 210, 90> will be filtered in (with a value of <0,210,0>) but it might be
that the original intuitive meaning of that filter was to exclude such pixels so when
checking this option, such pixels will be excluded and pixel like <101,255,50> will be
visible. - Separate to image per component (only on focus image)
Quite straightforward, a convenient (and fast) way to separate an image channels or to
apply the filter per color plane. For quick channels speration, just write *.
Note that you must have at least 3 available HK slots for this option to be available.

Example that shows how to apply a more complex filter and how the grid is affected
by filters